Setup
Equipment needed
a) Fisher & Paykel Airvo 2.
b) Pole stand with Airvo 2 and oxygen aggregate.
c) 1 x Water Chamber*. (900PT561)
d) 1 x Fisher & Paykel AirSpiral*. (900PT561)
e) 2 x Nasal Cannula Fisher & Paykel Optiflow (OPT942 / OPT944 / OPT946)
i) N.B! Both cannulae should be identic in size!
f) 2 x CPAP / BiPAP-tubing
i) 22 mm diameter and 1,8 m (3ft) length
ii) E.g. Philips Respironics BiPAP / CPAP Reusable Flexible Tubing
iii) N.B! Both tubes should be identic!
g) Optional, subject to availability: 2 x Philips Tubing Isolator – colloquially ”Tube Sock”)
i) Will help reduce condensation but not strictly needed for setup
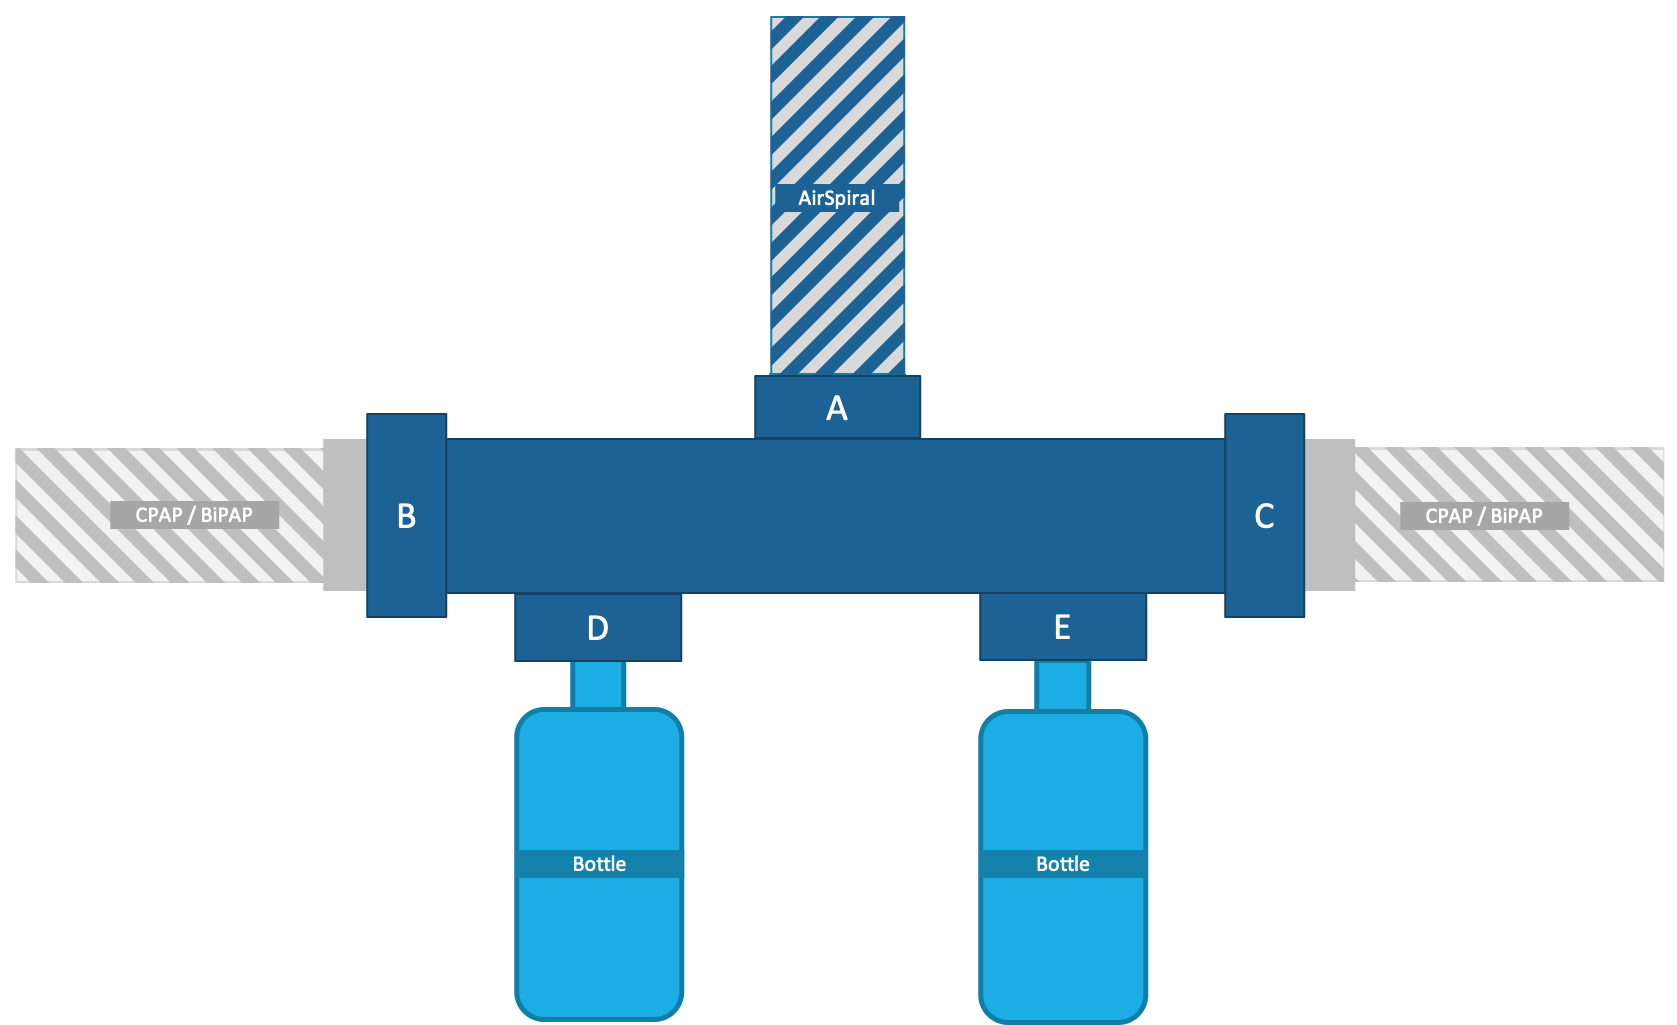
h) T-shaped connector, with markings ABCDE – ”T-Connector"
i) 2 x Smaller 22mm to Optiflow adapter – ”Adapter”
j) 2 x Cleaned 50 cl PET bottle – ”Collection bottle"
k) 2 x Cable Tie (at least 100 mm in length)
l) Optional: standard 22mm female plug or printable male plug
i) Only used when starting HFNO with SHFNO prepared setup
m) Optional: printable PET plug
i) Only used when starting HFNO with SHFNO prepared setup
n) Sterile water, 1000 ml.
*N.B. That the Air Spiral tube generally comes in a set with a water chamber ("Tube & Chamber Kit"), only one of which is used in the SHFNO setup.
 Fig 1. Schematic illustration of T-Connector
Setup
1) Attach (screw into place) two empty collection bottles to the ports on bottom of the T-connector, labeled D and E (will only fit these ports).
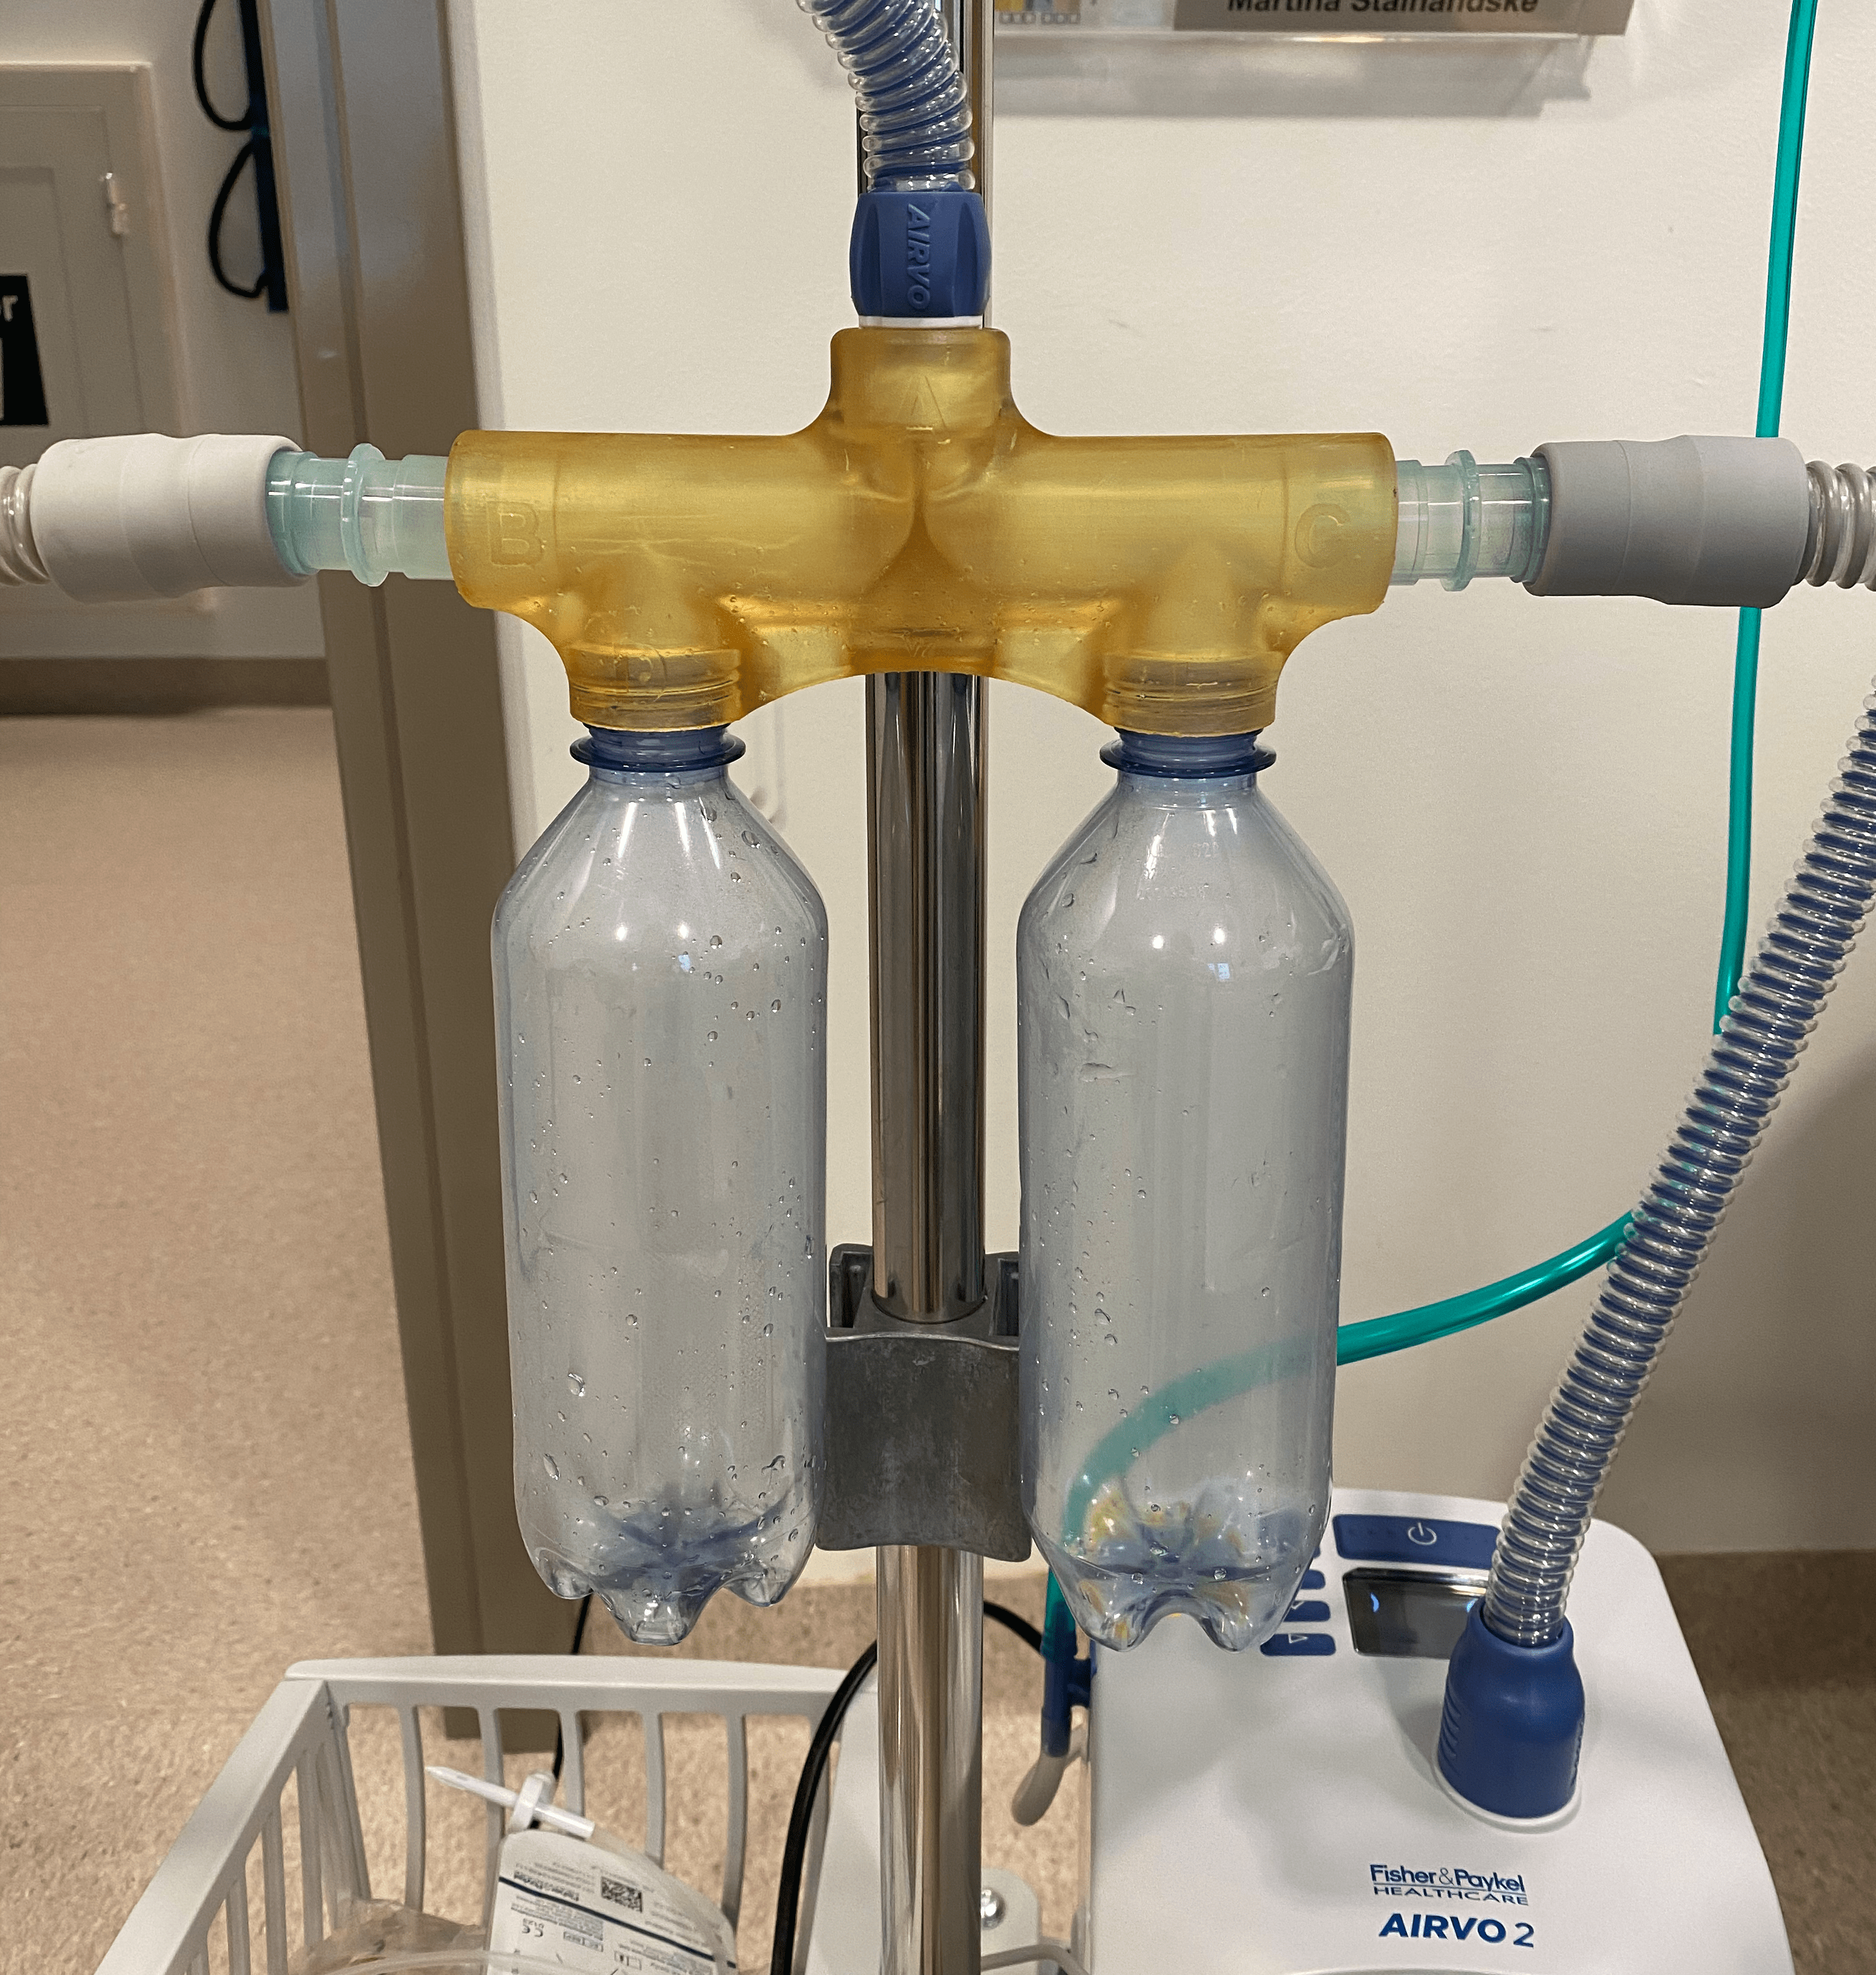
2) Attach the concave back of the T-Connector to the pole stand, slightly above and contralaterally to the Airvo 2. The T-Connector should be mounted below patient height. The T-connector should be oriented so that the collection bottles point downward and the AirSpiral tube connects to the top of the T-connector. Secure the T-connector to the pole using two cable ties which can be treaded through the holes on the back of the T-connector.
3) Prepare the water chamber by removing the blue port caps and fitting the supplied adapter. Fit the water chamber to the Airvo 2, ensure that the chamber clicks into place.
4) Connect the sterile water bag to the water chamber.
5) Connect the AirSpiral tube to the Airvo 2 and lock it into place by pushing down on sleeve.
6) Attach the distal end of the AirSpiral tube to the port on the top of the T-Connector, labeled "A" (will only fit this port). If possible, loop over the top of the pole stand so that condensation is allowed to drain either to the Airvo 2 or the collection bottles.
7) Connect the BiPAP/CPAP tubing to the two remaining ports on the T-connector (labeled B and C)†.
8) (If "Tube Socks" are available, attach these to each of the tubings)
9) Attach Adapter to the distal end of each BiPAP/CPAP tube.
10) Attach Optiflow nasal cannula to each adapter.
11) Attach oxygen aggregate to oxygen outlet.
12) The setup is now ready to initiate treatment!
†When starting HFNO with an SHFNO prepared setup, one side (B or C) of the T-connector is plugged. N.B. that both collection bottles are still needed.
| Schematic view | Prototype |
|---|---|
 |
 |
Video instructions
Initiation of Treatment
N.B. These are provided as suggestions and should be adapted to local guidelines before SHFNO is put to use.
Starting SHFNO
- Airflow is started at 60 litres/minute in the Airvo 2 system which delivers 30 litres/minute to each patient.
- FiO2 is started at 50% in the Airvo 2 system which delivers 50 % to each patient.
- N.B. FiO2 is titrated as usual, FiO2 will be consistent between both patients and the Airvo 2 display
- Set temperature to 37 °C. If needed the temperature can be lowered to 34 °C.
- Titrate FiO2 to keep both patients within desired saturation range.
Starting HFNO with an SHFNO prepared setup
- Setup according to steps above until you reach T-connector.
- Connect standard airway plug to empty side (at port labeled B or C) of T-connector
- Connect the rest of the T-connector as described above.
- Airflow is started at 30 litres/minute in the Airvo 2 system.
- FiO2 is started at 50% in the Airvo 2 system.
- Set temperature to 37 °C. If needed the temperature can be lowered to 34 °C.
- Titrate FiO2 to keep patient within desired saturation range.
Transitioning from HFNO with prepared setup to SHFNO
N.B. Water chamber and AirSpiral tube does not need to be changed if the setup has been prepared for SHFNO when adding a second patient to the setup.
- Connect CPAP/BiPAP to Adapter
- Connect Optiflow cannula to adapter (ensuring that it's of the same size as the other cannula in use).
- Attach nasal cannula to patient.
- Remove airway plug from T-connector and attach the prepared CPAP/BiPAP tube.
- Increase the airflow to 60 litres/minute.
- Titrate O2 to desired level.
Transitioning from HFNO to SHFNO
In order to decrease down time and ensure hygienic routines are being maintained, whenever possible transition from HFNO to SHFNO should be carried out by switching Airvo 2 systems. N.B. when transitioning a patient their Optiflow Nasal Cannula is kept, however water chamber and AirSpiral tube cannot be reused.
- Connect according to instructions above until having connected adapters to the distal end of the CPAP / BiPAP tube.
- If either of the patients is starting their treatment with SHFNO, rather than transitioning from HFNO, finish their setup according to the instructions above.
- Transition the Optiflow nasal cannula(e) already in use to the SHFNO-setup.
- Follow instructions "Starting SHFNO" and titrate desired treatment levels
Transitioning from SHFNO to HFNO
- Check for condensation throughout the tube system and make sure that any accumulation of fluid flows back to the collection bottles.
- Stop Airvo 2 flow as well as oxygen supply.
- Remove CPAP / BiPAP tube from T-connector and attach standard plug.
- Change collection bottle for the affected side of the setup
- N.B. The inactive side needs either a collection bottle or a PET plug (model available as optional part of main set).
- Start HFNO according to instruction "Starting HFNO with an SHFNO prepared setup"
Condensation
Be observant to any condensation within the tube system. In SHFNO the condensation increases and water can accumulate within the CPAP/BiPAP tube. Two times per shift, or around every 4 hours, the CPAP/BiPAP tube should be checked and raised in a matter ensuring that any fluid collection is helped to flow back to the collection bottle.
The collection bottle should be emptied before filling completely. It does not need cleaning when continuing treatment on the same patient after emptying. Make sure to reduce downtime by either removing the bottle and emptying it into another container and promptly screwing the bottle back on. If no other container is available, the bottle should be removed and another one attached to the system before disposing of the fluid collection. N.B. The system needs both bottles attached in order to function properly.
If possible, try to orient the CPAP and BiPAP tubes in a way that condensation can continuously flow back to the collection bottle. If a screen is used to divide patients, note that the tube cannot be passed over the screen as this affects flow of condensation.
Sterile water
SHFNO consumes more water per litre of flow through the system due to condensation being accumulated in collection bottles rather than flowing back to the water chamber. The Airvo 2 will alert when the water chamber is dry, please ensure that you change the sterile water bag before the water chamber is completely empty.
